

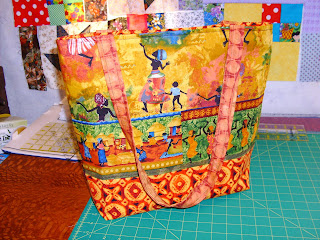

I would love to keep it, but I made it with these fabrics specifically for her because she recently became a Grandmother for Africa.
 I used the big tote bag pattern from this magazine.
I did make a few changes, though.
 I didn’t use 2 1/2 inch strips to make the larger top and bottom pieces on the outer bag. Instead I used use large prints – the bottom print here I didn’t even know I had enough of until I went shopping in my stash.
 I used a heavyweight sew-in interfacing on the outer bag pieces – because I had some! Not a usual ingredient in my cupboard, but, I had bought some to make TIES with and well, that my never happen. So, I used some on the outside panels and tucked some inside the pockets. I would use it again as it does give the bag some body and not much bulk. I didn’t use any interfacing on the lining and it is a bit ‘droopy’. I think it makes it behave more like a purse than a bag. We’ll see if my mom thinks that’s a good thing!
 I bought this panel awhile ago because I loved it. It’s been sitting in a pile ever since. So I cut it up and gave it a useful life. I measured to make sure it would make all the pieces I wanted then I started to dissect it!
From this panel I retrieved:

*two strips for the binding across the top of the pockets ( a detail I really like!)

*the inner pockets – I cut the columns of people you can see on the panels in half, then sewed the halves together to get the length I needed for the inner pockets
*two lining panels AND *two strips for the handles
 I added a recessed zipper to the bag – thanks to the guidance from this tutorial.
I guess I do have a pretty good stash. Inspiring and useful.
With Joy,
Sarah Vee
Leave a Reply
You must be logged in to post a comment.